Installing video drivers for Windows 7 on Dell Latitude D610 Series
This information is pulled from the website - http://www.groundstate.net/855GMWin7.html
When installing 855GM Series video driver Windows 7 reverts back to Standard VGA adapter after restart.
The problem is that 855GM Series video driver is not native for Windows 7 and it will always choose
Standard VGA Adapter as native video driver.
STEP 1
Make sure you unistall video drivers that do not work. If you see exclamation marks on your previous drivers in
Device Manager, unistall them. Your Device Manager should say that you have Standard VGA Driver installed under
Display category and exclamation mark on "video controller". Make sure you restart PC when asked.
STEP 2
We will need to edit "c:\windows\system32\drivers\vgapnp.sys" file now, but there is a problem. Windows Vista
and Windows 7 will NOT allow you to edit system files even when you are the admin. Changing security attributes of that
file did not work either. The file is owned by "TrustedInstaller" service. We will need to own the file and give
ourselves the full control to edit it.
Click 'Start' and in 'Search' type 'cmd'. The result will show on
top. Right-click
on 'cmd' and choose "Run as Administrator". If your account does not
have admin rights you might be prompted to enter username
and password. I used account that already has administrator
priviledges. You should have a command prompt with administrator
priviledges.
STEP 3
Lets say my logged in username is ntsAdmin
First command you do is:
takeown /f c:\windows\system32\drivers\vgapnp.sys
This will give ownship to the current user. You should see a message saying SUCCESS etc..
Second command you do is:
cacls c:\windows\system32\drivers\vgapnp.sys /G ntsAdmin:F
There will be a confirmation message so type 'y'. This will change
the security attributes to give you ONLY all the permissions
for the file. If you are paranoid as me and want original
permissions restored, I will show you how to restore the permissions
to the previous step later on in this tutorial :). If 'cacls'
command does not work you can try using 'icacls'. If you cannot
edit this file try to boot to "Save Mode" and try it again (Thx to
Giuseppe Chill).
STEP 4
Open c:\windows\system32\drivers\vgapnp.sys in any text editor. Just add any character to the begining of the text. Let's
say we will add character x . So the text should start with xMZ and the rest of stuff. Save the file. This edit
will render that file unusable.
STEP 5
In Device Manager uninstall Standard VGA Adapter. It will prompt you
to restart so do it. After install you will see a message
saying that certain devices did NOT installed successfuly, which is
GOOD :). Go to Device Manager and you should see the
exclamation point next to "video controller" and "video controller
(vga compatible)". Right-click on "video controller (vga
compatible)" and do update driver. Choose "Browse for the Driver"
(or something like it :) ). Point to the driver directory that you
downloaded and extracted (win2000). Click "OK". Wait for
the driver to be installed. It might hang for a little (It will say
that window is "not responding"). Do not worry as this is still
installing the driver. It will prompt you to restart so do it. (If
it does not prompt click anywhere and wait for message). After restart
it will finish installing the driver.
Congratulations!!! You should have a working video driver!!! :)
STEP 6
Open c:\windows\system32\drivers\vgapnp.sys in any text editor. Remove the first character you put there which was x.
Save the file. Your file will be usuable again :). You can stop here
if you want, but if you want to restore the permissions for the
file to original state go to next step.
STEP 7
Right-click on any other file in the c:\windows\system32\drivers. Choose "Properties". Go to "Security" tab. Now compare that
security tab with the security tab of c:\windows\system32\drivers\vgapnp.sys.
Just make sure the security tabs of those two
files look the same (all tabs and advanced options). In order to add
"TrustedInstaller" it is not the same as regular usernames because
it is a service.
You will need to type "NT SERVICE\TrustedInstaller" (without quotes)
when adding it to own the file and to have all permissions.
Once you done editing you can delete your account from c:\windows\system32\drivers\vgapnp.sys, because it was not there from
the beginning. We took control over and the previous commands added it by default.
Thursday, March 22, 2012
Setting a program to run in compatibility mode via the registry (can be applied via gpo)
Create the entry in:
HKEY_LOCAL_MACHINE\Software\Microsoft\Windows NT\CurrentVersion\AppCompatFlags\Layers
Type: REG_SZ
Name: Full path of application including extension
Data: See table below
For each application there are three settings that can be applied. The compatibility mode, (Display) Settings and the Privilege Level. One or multiple values can be set (separated by a space).
Compatibility Modes
Display Settings
Privilege Level
Create the entry in:
HKEY_LOCAL_MACHINE\Software\Microsoft\Windows NT\CurrentVersion\AppCompatFlags\Layers
Type: REG_SZ
Name: Full path of application including extension
Data: See table below
For each application there are three settings that can be applied. The compatibility mode, (Display) Settings and the Privilege Level. One or multiple values can be set (separated by a space).
Compatibility Modes
| Value | Description |
| WIN95 | Windows 95 |
| WIN98 | Windows 98 |
| WIN4SP5 | Windows NT 4.0 SP5 |
| WIN2000 | Windows 2000 |
| WINXPSP2 | Windows XP SP2 |
| WINXPSP3 | Windows XP SP3 |
| VISTARTM | Vista |
| VISTASP1 | Vista SP1 |
| VISTASP2 | Vista SP2 |
| WIN7RTM | Windows 7 |
| WINSRV03SP1 | Windows Server 2003 SP1 |
| WINSRV08SP1 | Windows Server 2008 SP1 |
Display Settings
| Value | Description |
| DISABLETHEMES | Disable Visual Themes |
| 640X480 | Run in 640 x 480 screen resolution |
| HIGHDPIAWARE | Disable display scaling on high DPI settings |
| 256COLOR | Run in 256 colors |
| DISABLEDWM | Disable Desktop Composition |
Privilege Level
| Value | Description |
| RUNASADMIN | Run program as an administrator |
Tuesday, June 7, 2011
Redeploy software to individual machines
In the past, after a piece of software had been deployed to a computer, it was not possible to a pain to re-deploy that software to an individual computer. With Specops, it is now possible easier. Instructions for Specops is under section A, instructions for legacy group policy software deployment is in section B.
A:
Before forcing the re-installation of the software, it is recommended that you remove the software from the computer, either through add/remove (if possible) or the Windows Software Cleanup Utility.
After the software is removed, run regedit and go out to: (see figure 1 below)
HKLM\Software\SpecopsSoft\Specops Deploy\Client Side Extension
Find any references to your software under both Managed Deployments and Orphaned Deployments and delete those references (see figure 2 below)
After the references are deleted, do a gpupdate /force (if the software is one that is set to be able to install while logged on) or restart the computer. The software should re-install at this point.
A:
Before forcing the re-installation of the software, it is recommended that you remove the software from the computer, either through add/remove (if possible) or the Windows Software Cleanup Utility.
After the software is removed, run regedit and go out to: (see figure 1 below)
HKLM\Software\SpecopsSoft\Specops Deploy\Client Side Extension
Find any references to your software under both Managed Deployments and Orphaned Deployments and delete those references (see figure 2 below)
After the references are deleted, do a gpupdate /force (if the software is one that is set to be able to install while logged on) or restart the computer. The software should re-install at this point.
 |
| Figure 1 |
 |
| Figure 2 (note that you have to look in each folder to find the reference to which piece of software is being pushed out) |
B:
This information is copied from http://www.techbunny.com/2010/03/reapplying-software-assignment-gpo-to.html on 2/7/2012
There is a place in the registry where a machine tracks all the software policies that have been applied – HKLM\Software\Microsoft\Windows\Current Version\Group Policy\AppMgmt.
You need to delete information from two different locations. First, the values for the software package under the AppMgmt key. The values are all in a GUID format, but you can find out the GUID of your application by looking for the Product code in the GPO intself. Find that in "Computer Configuration - Policies - Software Settings - Assigned Applications - (product name) - Deployment Information."
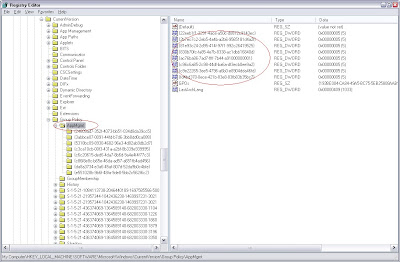
After you delete the proper entry under AppMgmt, find the corresponding application within the AppMgmt tree. This one is easier to find because the application name is listed as one of the values. (The product ID value will also match the GUID you deleted in the first step.) Delete the whole key.
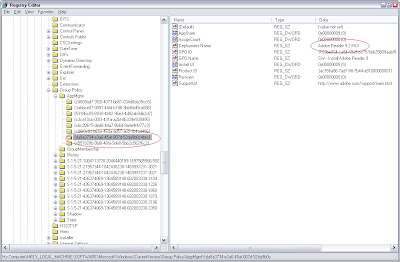 Once the keys are removed, run gupdate \force and then reboot. The software application GPO will apply again.
You need to delete information from two different locations. First, the values for the software package under the AppMgmt key. The values are all in a GUID format, but you can find out the GUID of your application by looking for the Product code in the GPO intself. Find that in "Computer Configuration - Policies - Software Settings - Assigned Applications - (product name) - Deployment Information."
After you delete the proper entry under AppMgmt, find the corresponding application within the AppMgmt tree. This one is easier to find because the application name is listed as one of the values. (The product ID value will also match the GUID you deleted in the first step.) Delete the whole key.
Once the keys are removed, run gupdate \force and then reboot. The software application GPO will apply again.Thursday, March 31, 2011
Adding a website to a RSS feed
I've found it really helpful to use RSS feeds on the favorites bars in IE and Firefox. RSS, or Really Simple Syndication, are web feed formats used to publish frequently updated works, such as blog entries or news headlines, in a standard format that is updated in real time.
The steps to add a site in each browser is a little different.
First browse to the page that you want to do a RSS feed to, in whichever browser you want to use. If the page has a RSS feed, you'll see the icon. Follow the instructions for the appropriate browser at this point.
IE: Click on the RSS feed on the toolbar (highlighted in the image above). This will open a new page. Click on the link "Subscribe to this feed" that is located towards the top of the page. Check the box "Add to Favorites Bar" in the window that pops up and click on Subscribe. This places the live feed in the Favorites bar of IE.
Firefox: Click on the RSS feed in the address bar. This will bring up a subscription window. Select "Bookmarks Toolbar" from the drop down box and click on Subscribe. This places the live feed in the Bookmarks toolbar of Firefox.
The steps to add a site in each browser is a little different.
First browse to the page that you want to do a RSS feed to, in whichever browser you want to use. If the page has a RSS feed, you'll see the icon. Follow the instructions for the appropriate browser at this point.
 |
| IE 8 toolbar (the RSS feed is highlighted in the image) -- If there is no feed for that page, it'll be grayed out |
IE: Click on the RSS feed on the toolbar (highlighted in the image above). This will open a new page. Click on the link "Subscribe to this feed" that is located towards the top of the page. Check the box "Add to Favorites Bar" in the window that pops up and click on Subscribe. This places the live feed in the Favorites bar of IE.
 |
| Firefox 3.5 address bar (the RSS feed is located at the end of the address bar) -- If there is no feed for that page, the icon will not show up |
Firefox: Click on the RSS feed in the address bar. This will bring up a subscription window. Select "Bookmarks Toolbar" from the drop down box and click on Subscribe. This places the live feed in the Bookmarks toolbar of Firefox.
IT Application (Teacher desktop, SPEEDe 2, etc...) won't load
This is concerning current generation IT applications such as Teacher Desktop or SPEEDe 2 (one wrote in .Net) that won't load.
Try deleting the folder 2.0 which is located under C:\Documents and Settings\user\Local Settings\Apps\
After you delete the folder, start the program back up and it should work correctly now.
Try deleting the folder 2.0 which is located under C:\Documents and Settings\user\Local Settings\Apps\
After you delete the folder, start the program back up and it should work correctly now.
Thursday, March 3, 2011
Computer not pulling down software policies
If you ever have a situation where you are not getting software to pull down, there are a couple things you can try.
First, check and make sure that the SpecOps CSE is installed and is the correct version. As of today, March 3rd 2010, the version is 4.2.1217.1
Second, check the log which is located at 'c:\Windows\debug\usermode\SpecopsDeployDeployments.log'
There is also an issue with the software where, if the target criteria within the software package settings has an issue (pointing towards an invalid OU is where I have seen the issue), that can also prevent software from pulling down.
That's all for my first entry of Tech Tips
First, check and make sure that the SpecOps CSE is installed and is the correct version. As of today, March 3rd 2010, the version is 4.2.1217.1
Second, check the log which is located at 'c:\Windows\debug\usermode\SpecopsDeployDeployments.log'
There is also an issue with the software where, if the target criteria within the software package settings has an issue (pointing towards an invalid OU is where I have seen the issue), that can also prevent software from pulling down.
That's all for my first entry of Tech Tips

Subscribe to:
Posts (Atom)